This post may contain affiliate links. For more details, see my disclosure page.

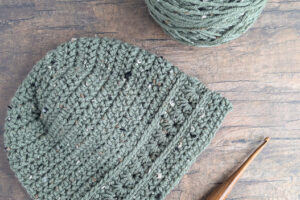
If you’ve seen my Spokane Hat and Shawlette, you will love this chunky version of the hat. It offers that same faux knit look and who doesn’t love a good knit-look hat for the fall and winter seasons!
I actually found the yarn for this hat when buying more yarn for another pattern I’ve been working on. The purple was too gorgeous to put back so obviously, I had to find a good reason to bring this yarn home with me. Then I thought “Chunky Spokane Hat!” So, I grabbed the oatmeal colorway as well.

The chunky version of this hat is worked up very similarly with the yarn over slip stitch and moss stitch. Which is super easy for beginners, and it works up in an hour or less. You don’t even use all the yarn for this hat, but definitely save it, because I have one or two more patterns using the same skein.
The moss stitch has been one of my favorites for years- though I first learned it as the granite stitch when I made this lovely cowl.
I use it so much that I even recently made a video tutorial for the stitch. You can watch that here.
It pairs really nicely with a tidy ribbed brim made with the yarn over slip stitch, don’t you think?
Here’s what you’ll need to make one:
I used a crochet hook in the N/10.0mm size. With a single crochet pattern, I always use a chunky ergonomic hook like this one, or my hands get sore so fast! This one from Furls is my Favorite.
You will use Wool Ease Thick & Quick yarn or another super bulky weight of your choosing. But you can pick from LOTS of colors for this one. Check them out here!
The exact colors I chose were Oatmeal and Raisin, which I thought was too cute of coincidence that I was drawn to those colors.
Of course, you’ll want a yarn needle and scissors, too, but I’ll bet you have those in your project bag already!
Abbreviations
Ch- chain; Sc- single crochet; Sc2Tog- single crochet 2 together; Sk- skip; Sl- slip; St- stitch; Yoss- yarn over slip stitch;
Gauge / Finished Size
Measuring in a 2”x2” space: 3 sc tall by 3 sc wide.
Hat measures 20” or 21” in circumference
Special Stitches
Yarn Over Slip Stitch (YOSS): Yarn over, insert hook into stitch indicated, yarn over and pull through all loops on hook to complete stitch.
I have a video tutorial for that stitch available.
Single Crochet 2 Together (Sc2Tog): Insert hook into first stitch indicated, yarn over, pull up a loop, insert hook into second stitch indicated, yarn over, pull up a loop, yarn over and pull through all loops on your hook to complete stitch.
Notes
This hat begins with the ribbing, worked in short rows, and joined into a hat band. Then, you’ll work upward in continuous rounds for the sides of your hat, and work decrease rounds until you can cinch it shut with a yarn needle.
Turning chains do NOT count as a stitch throughout.

Spokane Hat Pattern
Hat Ribbing
Ch 6
Row 1: sc in second chain from hook across [5]
Row 2-41: sc across [5]
Joining Row: Ch 1, turn, holding both ends of brim together without twisting, sl st together to join the hat band in a loop.
Flip inside out so that seam is on the inside of the brim.
*Check to make sure this is good fit, if not just add a few rows and make sure the row ends in an odd number.*

Hat Base
Work in continuous rounds. Use a stitch marker to keep track if desired.
Round 1: Ch 1, *sc in end of next row, ch 1, sk 1,* repeat around.
Round 2: Sk first sc, sc in first ch st, *ch 1, sk 1, sc,* repeat * to * around.
Round 3: *Ch 1, sk 1, sc,* repeat * to * around.
Repeat Round 3 until the hat is just about as tall as you desire- there will only be 3-4 decrease rounds. (I stopped at Round 10).
Decrease rounds: *Sc2Tog across next 2 ch, ch 1,* repeat * to * around. [count decreases by half]
Repeat until you have fewer than 8 stitches to stitch shut at the top of your hat. (I went just under 3 more rounds).
Finishing:
Fasten off, leaving a long tail.
Turn the hat inside out, then using a yarn needle, sew the top of the hat shut.
Weave in all ends.
Block lightly if desired.
Save for Later!