
This post may contain affiliate links. For more details, see my disclosure page.


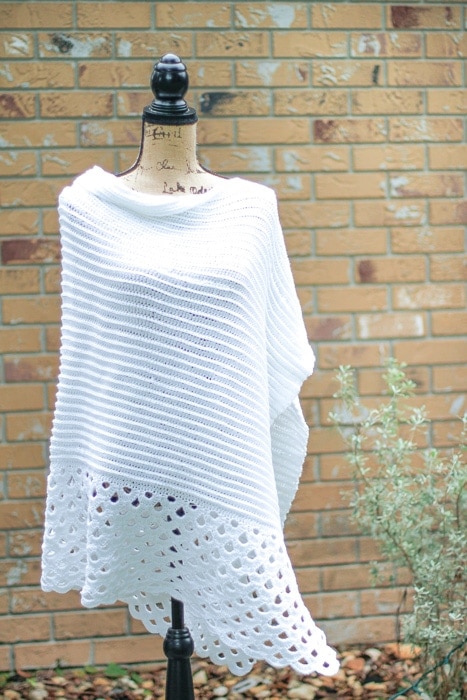
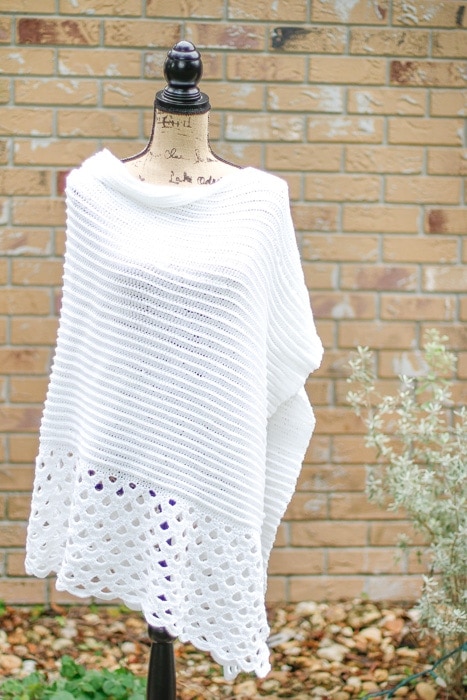
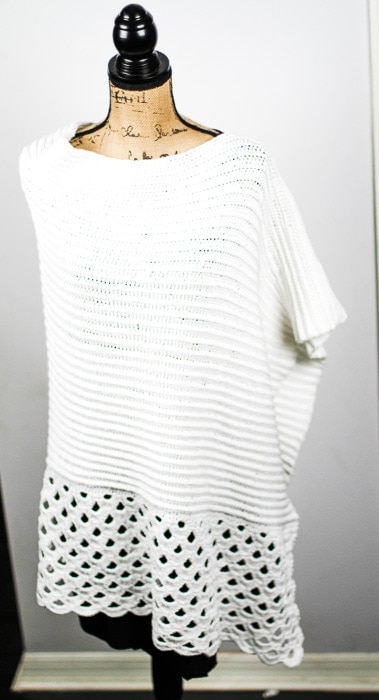
This beautiful free crochet poncho pattern works up (and wears!) like a breeze! Plus, the easy folded rectangle construction requires minimal seaming, making this a perfect crochet poncho pattern for beginners.
Want to Download this Pattern?
Scroll down for the free pattern, or purchase your ad-free printable PDF copy at the following sites:
Making your first crochet garment feels SO intimidating. All of a sudden, the aspects of crochet you glossed over- gauge, consistency, following patterns exactly- now make a HUGE difference in the look of your finished product. So how do you make the leap without unraveling into a knotted mess of yarn barf?
Easy! You start with an easy crochet poncho pattern!
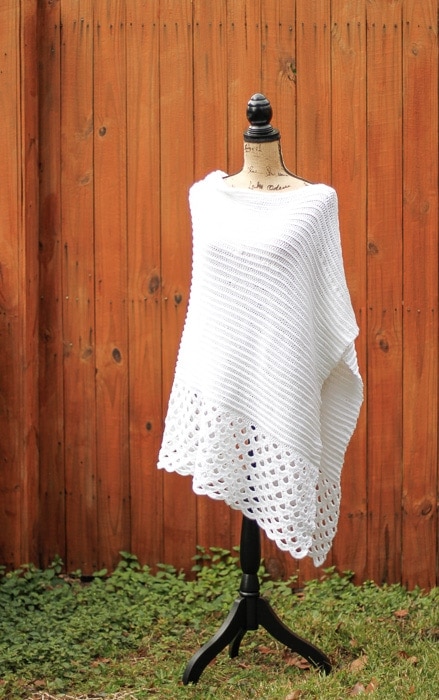
This beautiful and free crochet poncho pattern works up really nicely, even though the stitching is fairly basic.
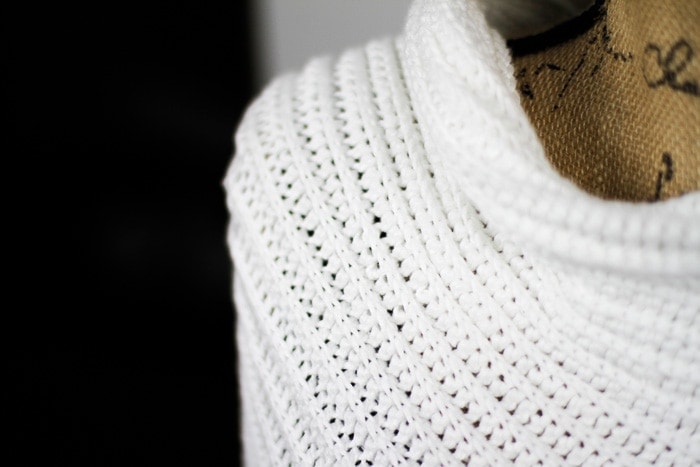
First, you’ll work a section of plain hdc ribbing, which gives you a bit to make sure your gauge is close enough to fit well.
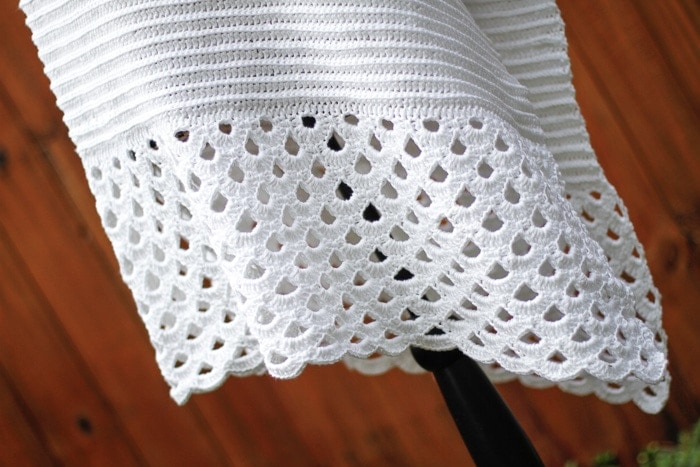
Then, the lace section adds just enough interest and elegance to keep the piece looking really amazing.
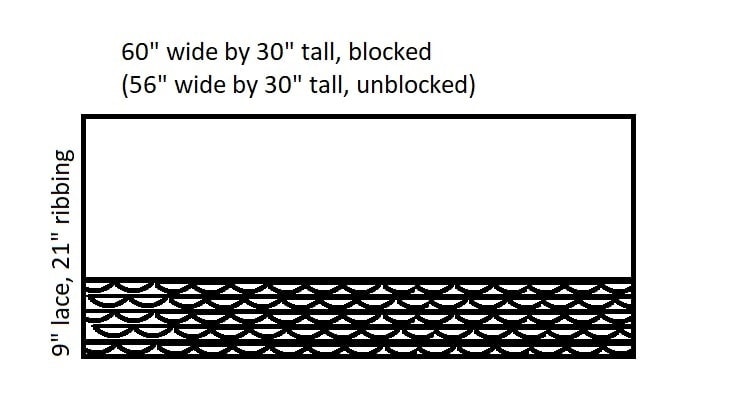
Better yet, there are handy schematics to help you feel confident that your piece is measuring correctly before you move on to the next section.
So are you ready to start your first garment pattern? Let’s crochet together!
Click here to add this pattern to your Ravelry favorites, or purchase an ad-free PDF copy.
Want to Download this Pattern?
Scroll down for the free pattern, or purchase your ad-free printable PDF copy at the following sites:
Materials
H/5.0mm Crochet Hook; 8 skeins Lion Brand Coboo, Light [3] weight, 51% cotton, 49% bamboo rayon yarn, 3.5oz/100g; 232 yd/212 m, shown in White; 732g / 1,700 yds used; Yarn Needle; Scissors
Abbreviations
Ch- chain; Dc – double crochet; Dtr- double treble crocht; Fhdc- foundation half double crochet; Hdc- half double crochet; Sc- single crochet; Sk- skip; St- stitch;
Gauge / Finished Size
10 sts and 6 rows in hdc through 3rd loop is 2” square before blocking.
Special Stitches
Spike stitch: working around the chain, insert hook into stitch indicated, yarn over, draw up a loop, yarn over and draw through both loops on hook.
Notes
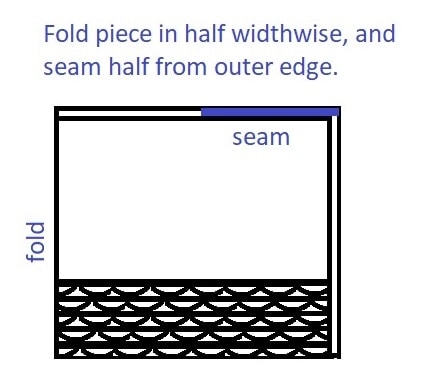
This poncho is worked from the top down in turned rows. There are schematics at the end to help you make sure your piece is meeting gauge, and to help with final construction.
Sunray Crochet Poncho Pattern Free
Ribbed Section
Row 1: Ch 2, fhdc 231. [231] Alternately, Ch 232, hdc in 2nd ch and across.
Row 2: Ch 1, turn, working through 3rd loops, hdc in each st across. [231]
Rows 3-75: Repeat Row 2.
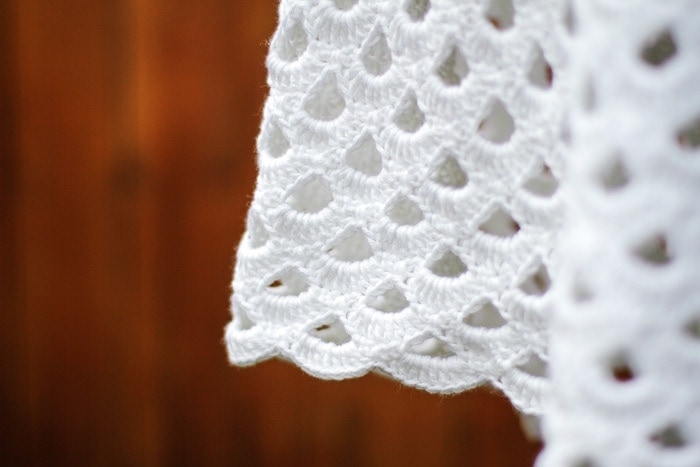
Collonade Stitch Lace Section
For ease of counting, we will begin the lace section at Row 1 again.
Row 1: Ch 1, turn, sc in first st, ch 1, sk next st, *sc in next st, ch 4, sk 2 sts, sc in next st, ch 3, sk 3 sts,* repeat * to * across until 6 sts remain, sc in next st, ch 4, sk 2 sts, sc in next st, ch 1, sk 1 st, sc in last st. [33 ch-4 loops]
Row 2: Ch 1, sc in first st, *work 9 dc into next ch-4 loop, spike st into center skipped sc from previous row,* repeat * to * across until last ch-4 loop, work 9 dc into last ch-4 loop, sc in last sc. [33 9dc groups]
Row 3: Ch 5, dtr in first st, ch 1, sk 2 dc, sc in 3rd dc, ch 3, sk 3 dc, *sc in next dc, ch 4, sk (2dc, spike, 2dc), sc in next dc, ch 3, sk 3 dc, * repeat * to * across until last 3 dc, sc in next dc, ch 1, dtr in last st. [1 ch-1 loop, 32 ch-4 loops, 1 ch-1 loop]
Row 4: Ch 2, work 5 dc in ch-1 loop, * sc spike over ch-3 loop into center skipped dc, work 9 dc into ch-4 loop,* repeat * to * across until last ch-3 loop; spike st across last ch-3 loop into center skipped dc, work 5 dc into final ch-1 loop. [1 5dc group, 32 9dc groups, 1 5dc group]
Row 5: Ch 1, turn, sc in first st, ch 1, sk 1 st, sc in next st, *ch 4, sk (2dc, spike, 2dc), sc in next dc, ch 3, sk 3 dc, sc in next dc,* repeat * to * across until last 8 st, ch 4, sk (2dc, spike, 2dc), sc in next dc, ch 1, sk 1 st, sc in last st. [33 ch-4 loops]
Row 6: Ch 1, turn, sc in first st, *work 9 dc into next ch-4 loop, spike stitch into center skipped dc,* repeat * to * across until last ch-3 loop, work 9 dc in last ch-4 loop, sc in last st. [33 9dc groups]
Rows 7-22: Repeat Rows 3-6 FOUR {4} times.
Finishing:
Fasten off and weave in all ends. Block lightly.
Thread your yarn needle with a 24” length of yarn. Fold in half and seam halfway across to form neckhole. Fasten off and weave in ends.

Want to Connect?
Hook up with other like minded crocheters in the Salty Pearl Crochet Circle on Facebook! You can share your WIP photos and get crochet tips, pattern support and more fiber fun.
Be sure to follow me on:

Janet says
Beautiful pattern! So, if I don’t make the seam and put the sides together, I can make a shawl?
Katie says
Hi Janet,
You could absolutely use it as a shawl pattern! It will come out to about 60″ wide by 30″ tall, but it’d be fairly easy to adjust the measurements to your liking.
Happy experimenting!
Katie
Tammy Scott says
This looks so elegant and seems quite easy to make.
Thank you so much for the pattern.
Katie says
Thanks Tammy! It really is a fairly straightforward pattern, especially after you get the hang of the collonade stitch patern. Glad you like it!
Katie
Katie says
Thank you so much, Tammy! I appreciate you taking the time to leave such a lovely comment. <3
Michele Reid says
Katie, this poncho is so pretty! I’ve never made a garment before. Is this “one size fits all?” I am not tall and I’m wondering if this will be too long?
Katie says
Hi Michele,
This pattern is written as a one size fits most, but you can absolutely make some pretty simple adjustments to make it fit YOU. I’ve included measurements in the pattern to help you adjust the fit- it’s basically a 30×60 rectangle when it’s done. If you’re short, you might want to do less hdc rows, because I am fairly average (5’7) and it was a little smidge longer than I would have liked. Since you’re more concerned about length, you really wouldn’t have to do any adjusting besides working less length/fewer rows of the hdc ribbing. Check the schematic to see how many inches my pattern worked, and you can adjust from there. (But for anyone who does want to do adjust width, the stitch repeat is a 6 I believe.)
Hope that’s helpful,
Katie