This post may contain affiliate links. For more details, see my disclosure page.
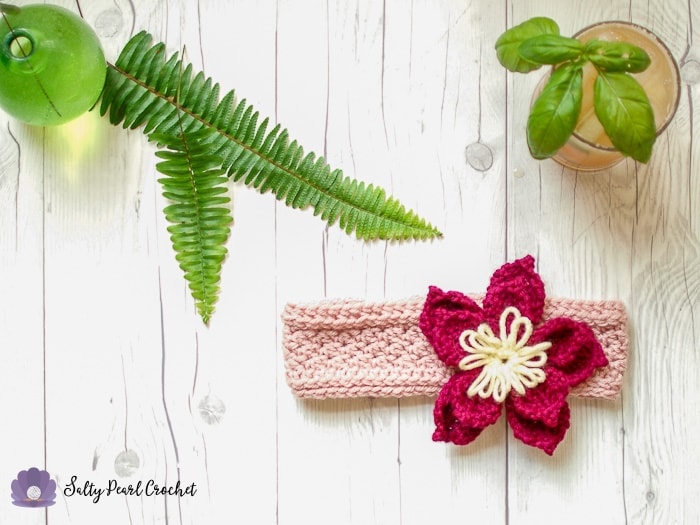
This gorgeous crochet flower makes quite a statement on a headband! As a girl raised in the South, (well, sort of), I’ve always been a huge fan of bows and flowers. And of course, you’ll know that means HUGE bows and flowers. I have a fun silhouette of myself as a 6 year old that has an absolutely enormous bow in it. So when Kirsten suggested we team up to do a Headband CAL, I knew I’d have some sort of big flower or bow to embellish mine.
Click Here to Pin the Pink Crochet Magnolia Pattern on Pinterest!
I’ll have you know, even though this gorgeous, double layered flower is 5″ in diameter, it’s actually quite a bit smaller than my original sample! If you’d like to see the bigger one, leave me a comment and I’ll consider making another sample! But when Kirsten mentioned that it might be too big to size down for my daughter, and then Nessie asked to have my flower all in the same day, I decided I should make a new version. That’s also why it’s a pink magnolia, instead of the traditional white.
As often happens, time got the better of me, and we’ll be pushing the segments back a day or two. To make it up to you all, I have a real treat for you! In addition to the crochet pattern, I’m sharing some quick flatlay photography tips, and a cocktail recipe to get you through the rest of your week. (I just have a feeling I’m not the only one who’s had a crazy week!)
3 Quick Tips for Flat Lay Photography
I’m not at all claiming to be an expert at flat lay photography, but I was pleased with how this shot came out! Here are three quick and easy tips to help you style a flat lay photography.
1. Use Color Theory
I often feel like choosing colors falls far outside the spectrum of my creativity! After all, I’m a fiber artist, and a hobby photographer, but I never studied fine art or painted at all. But choosing color can be simplified down to a few easy guidelines to help you stage a good photo.
Try using complementary colors. If you remember your color wheel, you’ll know that red and green lie opposite on the spectrum. Blue and orange would make nice complements as well, as do yellow and purple. You can also try analogous colors- which means colors that are close to one another on a color wheel. That’s what makes the red work so well with this pink Lazy Suzette Headband!
This also applies to the background! While this flower looked great on the white background, the next flower in my series was white, and so I chose to shoot it on a darker gray background, and it made a much more powerful image.
2. Rule of Thirds
One way to draw viewers to the subject of you photo is by composing it well. One very famous guideline for photo composition is called the Rule of Thirds. In a nutshell, putting the focal point towards the top, bottom, left or right of a photograph, instead of dead center, can really make your image stand out!
3. Leading Lines
Another quick and easy way to add interest to a photo is to frame the subject with leading lines. Here, you see that my ferns point straight down to the flower- which draws your attention there, instead of up to the cocktail. (Well, okay, admittedly the cocktail had my attention, but it was a long week! Don’t judge.)

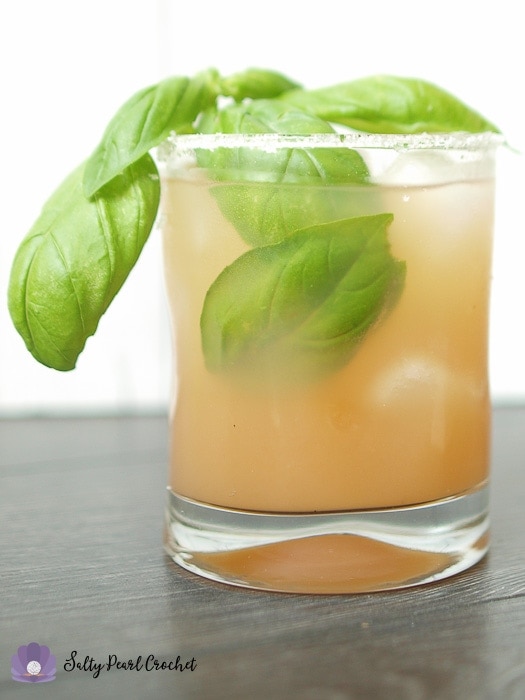
Basil Grapefruit Chiller Recipe
Ingredients
2 oz. Gin
2 oz. Triple Sec
4 oz. Grapefruit Juice
2 oz. Lemon Lime Soda
Basil for the rim
Splash of grenadine
Optional: Sugar, for the rim of the glass
Ice for serving

Directions
Optional: Wet the rim of your tumbler with water, and dip in a plate of sugar.
Add gin, triple sec, and grapefruit juice together in a cocktail shaker.
Shake to mix.
Crush two basil leaves and place in your glass with ice.
Pour the contents of the shaker into your glass.
Top with the lemon-lime soda.
Add a splash of grenadine for color.
Place a sprig of basil in the top of your glass for garnish.
Enjoy with a nice crochet pattern to unwind!
Crochet Magnolia Pattern
Materials
This post contains affiliate links to help maintain the free crochet patterns and tutorials we offer here. Thank you for supporting me!
Red Heart Soft Yarn (256 yds, 141 g, Aran (4) weight 100% Acrylic), approx 100 yds.
1 skein Berry, 1 skein Honey – you’ll need much less than the whole skein!
Abbreviations
Ch- chain, Sc- single crochet, Dc – double crochet, Lp – loop, Pc- picot, Sk – skip Sl – slip
Special Stitches
Loop Stitch: See video tutorial here: https://www.youtube.com/watch?v=iuR0OlDqH0g
Picot: ch 3, slip into third ch from hook.
Gauge / Finished Size
4 sts and 2 rows DC in 1”. Finished Flower measures 5” in diameter.
Notes
You will overlap the first and last stitches of rounds 2 and 3- that’s just fine! The petals will still lay flat.
Save it to your Ravelry Favorites!
Instructions
With the accent color, Ch 5, sl to join.
Round 1: Ch 1, work 15 Loop stitches into ring. Slip to first st to join. [15 Lps]
Fasten off your accent color. This completes your base round.
Using Main Color, join with a slip stitch to the back loop of any stitch on the base round.
Round 2: Work through back loop only. Begin Making Small Petals:
SMALL PETAL
- Chain 7. Dc in 3rd ch from hook and next st. Hdc in next 2 ch, sc in last ch. Sl to next st in previous round, turn.
- Sc in Sc, Hdc in next 2 Hdc, Dc in next dc, 2dc in final Dc. Pc, ch 1, turn
- Dc in first dc, and next 2 dc. Hdc in next 2 Hdc, Sc in Sc. Sl to next st in base, turn.
- Sc in Sc, Hdc in next 2 hdc, Dc in next Dc, Dc2tog. Turn.
- Skip first Dc, Sl in next 4 sts. Sl to next st in base.
SMALL PETAL COMPLETE. Make four more petals, then sl to front loop of base.
Round 3: Work through remaining front loops only. Begin Making Large Petals:
LARGE PETAL
- Slip stitch into the next loop. Chain 10. Dc in 3rd ch from hook and next 2 ch. Hdc in next 3 ch, Sc in last 2 ch. Sl to next st in previous round, turn.
- Sc in first 2 Sc, Hdc in next 3 Hdc, Dc in next 2 dc, 2dc in final dc. Pc, ch 1, turn.
- Dc in first dc, and next 3 dc. Hdc in next 3 Hdc, Sc in last 2 Sc. Sl to next st in base, turn.
- Sc in first 2 Sc, Hdc in next 3 hdc, Dc in next 2 Dc, Dc2tog. Turn.
- Skip first dc, sl in next 7 sts. Sl to next st in base.
LARGE PETAL COMPLETE. Make four more large petals to complete round 3, then sl to complete the round.
Break yarn and weave in all ends. Sew flower to accessory, or attach a button for a removable piece.
Thank you so much for supporting Salty Pearl Crochet! Please let me know if you have any questions or would like additional information about the pattern. I love seeing your creations on Ravelry or Instagram (#SaltyPearlCrochet), and I am always happy to offer pattern support for all of my crochet patterns as written.
You are more than welcome to sell any finished items made from this pattern. Please use your own photos and credit Katie Clary as the designer. Links back to my blog post are greatly appreciated! Please feel free to share this pattern by directing others to this blog post or the Ravelry listing, NOT by distributing the pattern or photos as your own.
Want to connect? Join the Salty Pearl Crochet Circle so we can crochet together on Facebook. I would love to crochet along with you! Join my mailing list and receive the first updates and even some special promos and discounts in my newsletter, or you can follow me on:
Facebook: https://www.facebook.com/SaltyPearlCrochet/
Pinterest: https://www.pinterest.com/theSaltyPearl/
Instagram: https://www.instagram.com/SaltyPearlCrochet
Ravelry: https://www.ravelry.com/designers/Katie-Clary


Kathy says
Loved your post and am grateful for all your ideas!
Katie says
Thank you Kathy! <3 So glad you're finding some crochet inspiration here! Happy hooking!
Katie