This post may contain affiliate links. For more details, see my disclosure page.
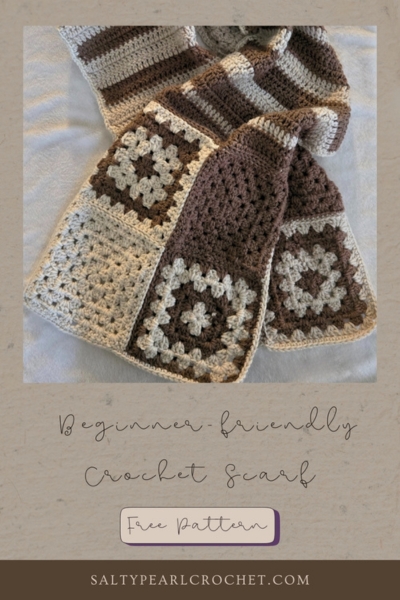
There is something timeless and comforting about a scarf. It adds warmth, texture, and your own personal style to any outfit on chilly days. Whether you wear it for a fashion statement or some extra coziness to stay warm (or both), you can’t go wrong adding a scarf to your daily look during the winter.
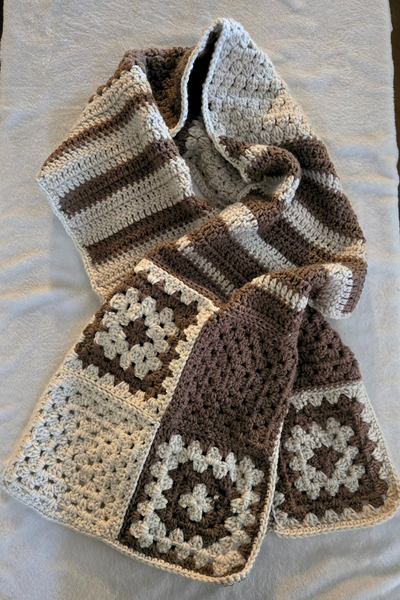
I made this scarf to be stylish AND cozy. You will love this scarf and its many fun and relaxing stitches. And I’m sure you’re wondering, “Katie, why is it called scarf a la mode?” Well, there is a fun story. The colors I chose, I originally chose because I thought they were two great neutrals for almost any outfit. But as the scarf came together, the colors reminded me of brownies and ice cream: brownie a la mode.
Fun, silly and comforting comparison. The brown color being the brownie and the cream color being the ice cream. But the cream color pairs so nicely with almost any color. To make the metaphor even more fun, consider the scarf as the warm comfort on a chilly winter day. The warm dessert paired with cold ice cream. You just can’t beat the comfort of that.
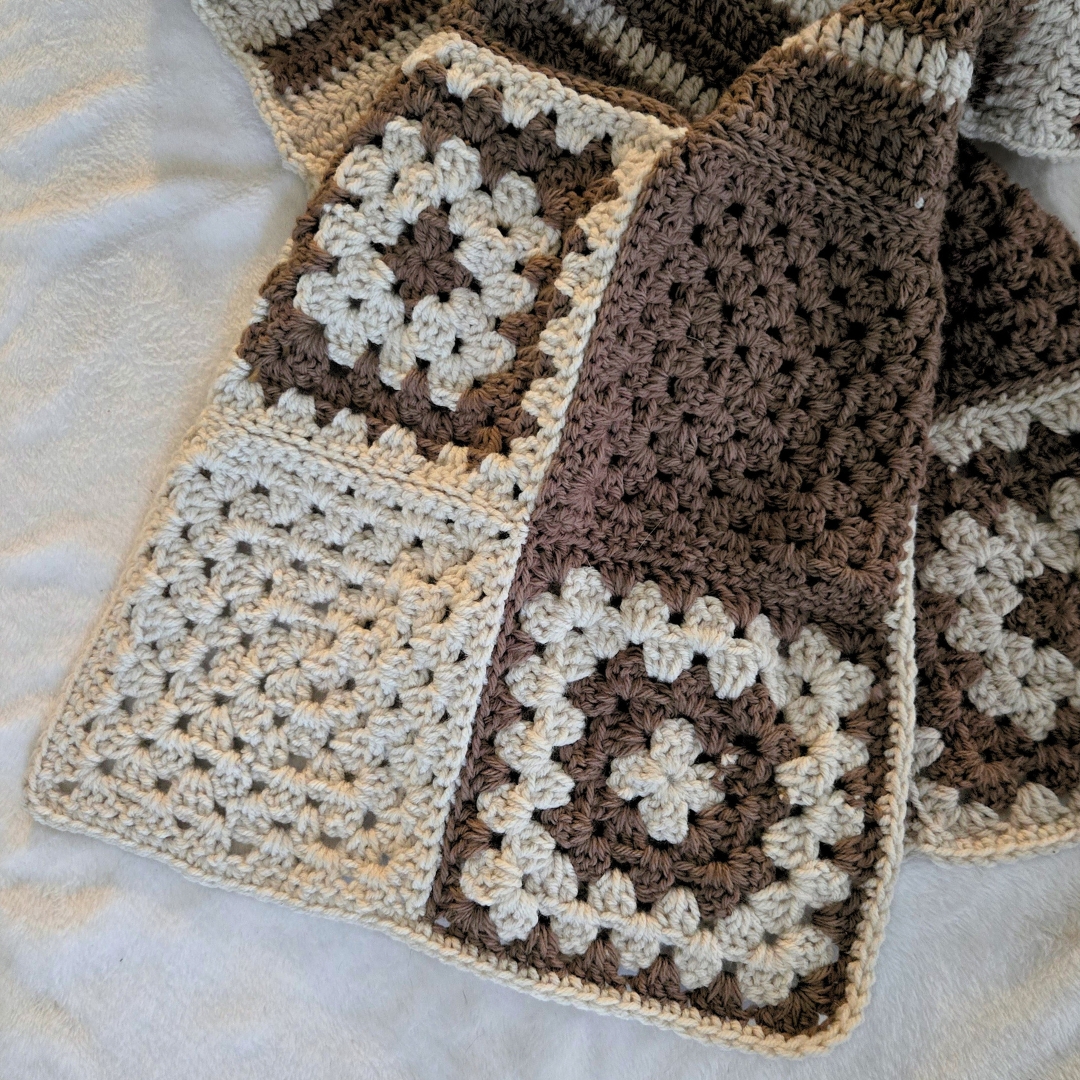
Not to mention, the scarf is made up of granny squares, cluster stitches and double crochet stitches. You can customize the length as well by adding or taking away the rows of cluster stitches and double crochet stitches and voila: scarf a la mode.
You can take or leave whatever you’d like with this scarf. Once you start in rows, this pattern becomes meditative and relaxing. And with it only using two colors, it could be a fun project to pack for a long car ride.
Let’s jump into the supplies you’ll need and the pattern. Happy crocheting!
Supplies:
G/5.5 mm Crochet Hook – I used my new Furls Metal Streamline, they’re so comfortable to use! Pick your favorite one here!
[4] worsted weight of your choosing – I used:
Loops & Threads Soft Classic in colorway Mushroom (2.5 skeins)
Wool Ease by Lion Brand Solid Yarn in colorway Thrush (3 skeins)
And of course, you will need a yarn needle and scissors for dealing with ends.
Abbreviations:
Ch– chain; Dc– double crochet; Sc– single crochet; Hdc– half double crochet; Cl– Cluster stitch; Sk– skip; St– stitch;
Abbreviations
Ch- chain; Dc- double crochet; Sc- single crochet; Hdc- half double crochet; Cl- Cluster stitch; Sk- skip; St- stitch;
Gauge Swatch/Finished Size:
There is no specific gauge for this pattern, just making sure that the finished size is approximate. Each section of different stitches is about 13” tall by 13” wide.
13” Wide x 78”-80” long
Special Stitches
Cluster Stitch: Yarn over, insert hook into stitch indicated, yarn over and draw loop through stitch, yarn over and pull through two loops (2 loops on hook), yarn over, insert hook into same stitch, yarn over and draw loop through stitch, yarn over and pull through two loops (3 loops on hook), yarn over and draw loop through stitch, yarn over and pull through two loops (4 loops on hook), yarn over and pull through three loops to complete stitch.
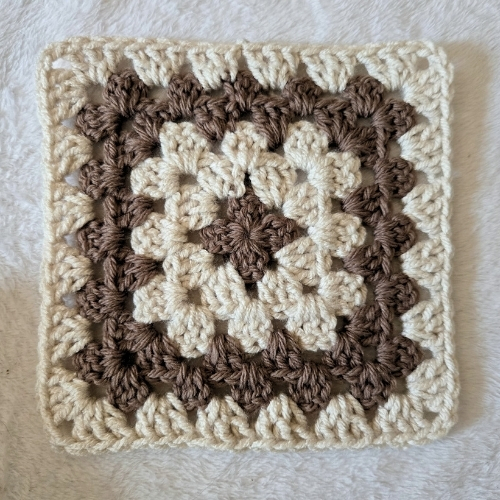
Granny Squares
If you’ve decided to use the same yarn I used you will only be using two colors. Color A is Mushroom Color B is Thrush. The pattern is made for two different colors, but you can use as many as you’d like.
First Square (Make 2)
Round 1: (With Color A) Ch 4, sl to first ch to form a ring, ch 2, (work 3 dc in ring, ch 2) four times, sl to first dc to join, then break yarn and fasten off. [4 granny clusters]
Round 2: (With ColorB ) Turn your work. In any corner, join yarn with a standing dc and dc 2 in the same corner, *ch 1, sk next granny cluster, (3 dc, ch 2, 3 dc) in next corner ch-2 sp,* repeat * to * 2 more times, ch 1, sk next granny cluster, 3dc in first corner ch-2 sp, ch 2, sl to first dc to join, then break yarn and fasten off. [8 granny clusters]
Round 3: (With Color B)Turn your work. In any corner, join yarn with a standing dc and dc 2 in the same corner, *ch 1, sk next granny cluster, 3 dc in next ch, ch 1, (3 dc, ch 2, 3 dc) in next corner ch-2 sp,* repeat * to * 2 more times, ch 1, sk next granny cluster, 3dc in next ch, ch 1, sk next granny cluster, 3dc in first corner ch-2 sp, ch 2, sl to first dc to join, then break yarn and fasten off. [12 granny clusters]
Round 4: (With Color A) Turn your work. In any corner, join yarn with a standing dc and dc 2 in the same corner, *{ch 1, sk next granny cluster, 3 dc in next ch} two times, ch 1, (3 dc, ch 2, 3 dc) in next corner ch-2 sp,* repeat * to * 2 more times, {ch 1, sk next granny cluster, 3 dc in next ch} two times, ch 1, sk next granny cluster, 3 dc in first corner ch-2 sp, ch 2, sl to first dc to join, then break yarn and fasten off. [16 granny clusters]
Round 5: (With Color A) Turn your work. In any corner, join yarn with a standing dc and dc 2 in the same corner, *{ch 1, sk next granny cluster, 3 dc in next ch} three times, ch 1, (3 dc, ch 2, 3 dc) in next corner ch-2 sp,* repeat * to * 2 more times, {ch 1, sk next granny cluster, 3 dc in next ch} three times, ch 1, sk next granny cluster, 3 dc in first corner ch-2 sp, ch 2, sl to first dc to join, then break yarn and fasten off. [20 granny clusters]
Round 6: (With Color B) Turn your work. In any corner, join yarn with a standing dc and dc 2 in the same corner, *{ch 1, sk next granny cluster, 3 dc in next ch} four times, ch 1, (3 dc, ch 2, 3 dc) in next corner ch-2 sp,* repeat * to * 2 more times, {ch 1, sk next granny cluster, 3 dc in next ch} four times, ch 1, sk next granny cluster, 3 dc in first corner ch-2 sp, sl to first dc to join, then break yarn and fasten off. [24 granny clusters]

Second Square (Make 2)
Round 1: (With Color B) Ch 4, sl to first ch to form a ring, ch 2, (work 3 dc in ring, ch 2) four times, sl to first dc to join, then break yarn and fasten off. [4 granny clusters]
Round 2: (With Color A ) Turn your work. In any corner, join yarn with a standing dc and dc 2 in the same corner, *ch 1, sk next granny cluster, (3 dc, ch 2, 3 dc) in next corner ch-2 sp,* repeat * to * 2 more times, ch 1, sk next granny cluster, 3dc in first corner ch-2 sp, ch 2, sl to first dc to join, then break yarn and fasten off. [8 granny clusters]
Round 3: (With Color A)Turn your work. In any corner, join yarn with a standing dc and dc 2 in the same corner, *ch 1, sk next granny cluster, 3 dc in next ch, ch 1, (3 dc, ch 2, 3 dc) in next corner ch-2 sp,* repeat * to * 2 more times, ch 1, sk next granny cluster, 3dc in next ch, ch 1, sk next granny cluster, 3dc in first corner ch-2 sp, ch 2, sl to first dc to join, then break yarn and fasten off. [12 granny clusters]
Round 4: (With Color B) Turn your work. In any corner, join yarn with a standing dc and dc 2 in the same corner, *{ch 1, sk next granny cluster, 3 dc in next ch} two times, ch 1, (3 dc, ch 2, 3 dc) in next corner ch-2 sp,* repeat * to * 2 more times, {ch 1, sk next granny cluster, 3 dc in next ch} two times, ch 1, sk next granny cluster, 3 dc in first corner ch-2 sp, ch 2, sl to first dc to join, then break yarn and fasten off. [16 granny clusters]
Round 5: (With Color B) Turn your work. In any corner, join yarn with a standing dc and dc 2 in the same corner, *{ch 1, sk next granny cluster, 3 dc in next ch} three times, ch 1, (3 dc, ch 2, 3 dc) in next corner ch-2 sp,* repeat * to * 2 more times, {ch 1, sk next granny cluster, 3 dc in next ch} three times, ch 1, sk next granny cluster, 3 dc in first corner ch-2 sp, ch 2, sl to first dc to join, then break yarn and fasten off. [20 granny clusters]
Round 6: (With Color A) Turn your work. In any corner, join yarn with a standing dc and dc 2 in the same corner, *{ch 1, sk next granny cluster, 3 dc in next ch} four times, ch 1, (3 dc, ch 2, 3 dc) in next corner ch-2 sp,* repeat * to * 2 more times, {ch 1, sk next granny cluster, 3 dc in next ch} four times, ch 1, sk next granny cluster, 3 dc in first corner ch-2 sp, sl to first dc to join, then break yarn and fasten off. [24 granny clusters]
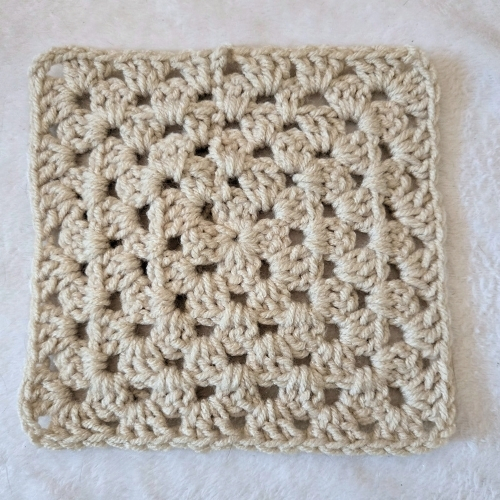
Third Square (Make 2)
Crochet a granny square of six rounds in Color A.
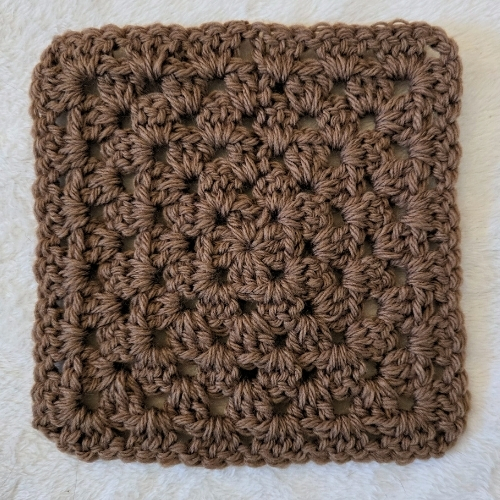
Fourth Square (Make 2)
Crochet a granny square of six rounds in Color B.
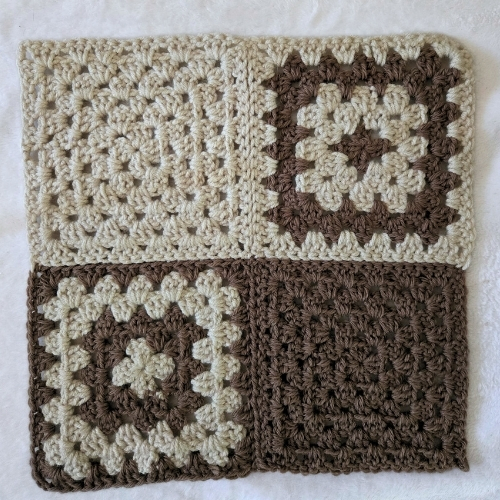
Take one of each of your granny squares, and connect them in the layout below with the whip stitch. Take the other 4 squares and set aside.
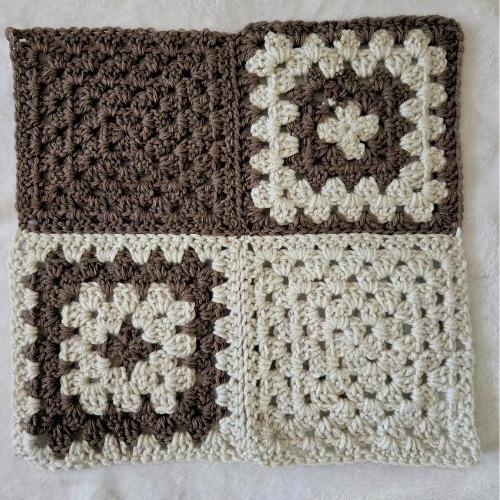
On the top right corner of your joined granny squares with Color A.
We will start crocheting in rows from here.
Row 1: hdc 41 across [41]
Rows 2-3: dc across ][41]
Switch to Color B
Row 4: dc across [41]
Switch to Color A:
Rows 5-7: dc across [41]
Switch to Color B
Rows 8-9: dc across [41]
Switch to Color A
Rows 10-12: dc across [41]
Switch to Color B
Rows 13-14: dc across [41]
Switch to Color A
Rows 15-17: dc across [41]
Switch to Color B
Row 18: dc across [41]
Switch to Color A
Rows 19-21: dc across [41]
Switch to Color B
Row 22: Ch 2, cl in 3rd ch from hook, *ch 1, sk 1, cl,* repeat * to * across. [41st , 20 cl]
Row 23: ch 3, sk first st, *ch 1, sk 1, cl,* repeat * to * across, dc in last ch 2 space. [41 st, 19 cl]
Row 24: Ch 2, cl in ch 1 space, *ch 1, sk 1, cl,* repeat * to * across. [41 st, 20 cl]
Row 25: Repeat Row 23
Row 26: Repeat Row 24
Row 27: Repeat Row 23
Row 28: Repeat Row 24
Row 29: Repeat Row 23
Row 30: Repeat Row 24
Row 31: Repeat Row 23
Row 32: Repeat Row 24
Switch to Color A
Row 33: Repeat Row 23
Row 34: Repeat Row 24
Row 35: Repeat Row 23
Row 36: Repeat Row 24
Row 37: Repeat Row 23
Repeat 38: Repeat Row 24
Row 39: Repeat Row 23
Row 40: Repeat Row 24
Row 41: Repeat Row 23
Row 42: Repeat Row 24
Row 43: Repeat Row 23
Switch to Color B
Row 44: hdc across [41]
Rows 45-47: dc across [41]
Switch to Color A
Row 46: dc across [41]
Switch to Color B
Rows 47-49: dc across [41]
Switch to Color A
Rows 50-51: dc across [41]
Switch to Color B
Rows 52-54: dc across [41]
Switch to Color A
Rows 55-56: dc across [41]
Switch to Color B
Rows 57-59: dc across [41]
Switch to Color A
Row 60: dc across [41]
Switch to Color B
Rows 61-62: dc across [41]
Row 63: hdc across [41]
Cut yarn, leaving a tail long enough for seaming the remaining granny squares to the bottom of the scarf. Set the project aside.
Now take your remaining granny squares and seam them together with the whip stitch like the picture.
Once you are finished seaming those together, take the right side of granny squares and right side of scarf and face them together, then seam them together with the whip stitch.
Assembly:
You can add the fringe or leave it off. Whatever your preference is! I also added a half-double crochet border around the entire scarf but make it your own!
Finishing:
Fasten off. Weave in all ends. Block lightly if desired. Enjoy your new cozy scarf!
Save it for later!